エンコーダを使ってオドメトリ
- 2020.07.27
- 未分類

先日、Amazonで買ったエンコーダ付きのモータについて記事にしましたが、これを使ってオドメトリを試してみました。
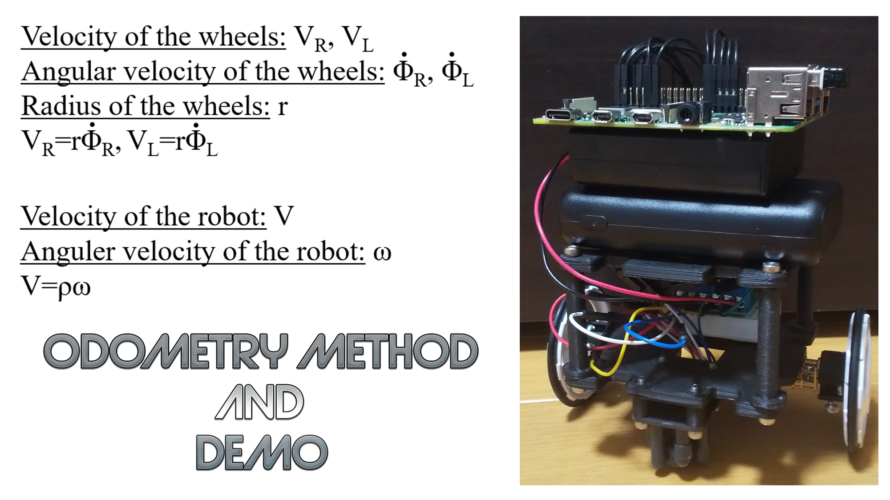
オドメトリ法
オドメトリのアルゴリズムについて、ブログに書こうと思ったのですが、数式だけでなく画像も用意する必要があり、折角なので動画にしました。
考え方や数式はとても単純なものです。
プログラム
ロボット全体のプログラムを載せると長くなるので、オドメトリクラスを載せておきます。
|
1 2 3 4 5 6 7 8 9 10 11 12 13 14 15 16 17 18 19 20 21 22 23 24 25 26 27 28 29 30 31 32 33 34 35 36 37 38 39 40 41 42 43 44 45 46 47 48 49 50 51 52 53 54 55 56 57 58 59 60 61 62 63 64 65 66 67 68 69 70 71 72 73 74 75 76 77 78 79 80 81 82 83 84 85 86 87 88 89 90 91 92 93 94 95 96 97 98 99 100 101 102 103 104 105 106 107 108 109 110 111 112 113 114 115 116 117 118 119 120 121 122 123 124 125 126 127 128 129 130 131 132 133 134 135 136 137 138 139 140 141 142 143 144 145 146 147 148 149 150 151 152 153 154 155 156 157 158 159 160 161 162 163 164 165 166 167 168 169 170 171 |
class Odometry: def __init__(self): self.phi=[0,0] #wheel angle self.prev_phi=[0,0] #previous wheel angle self.v=[0,0] #wheel velocity self.theta=0 #robot direction self.pos=[0,0] #position (x,y) self.r=28./1000 #wheel radius [m] self.delta=2*math.pi/(4*3*298) #incremental value of wheel angle self.pin_ab=[14,15,5,6] #encoder pin self.pin_m=[17,27,19,26] #motor pin self.pin_pwm=[2,13] self.pwm=[None, None] self.d=52./1000 #distance between wheel and robot center self.prev_data=[0,0] self.cnt=[0,0] self.prev_cnt=[0,0] self.target_theta=0 self.target_motion=0 #0:forward,1:backward,2:right,3:left self.e=0 self.prev_time=0 self.dt=0.01 def setup(self): for i in range(len(self.pin_ab)): GPIO.setup(self.pin_ab[i], GPIO.IN, pull_up_down=GPIO.PUD_UP) GPIO.setup(self.pin_m[i], GPIO.OUT) GPIO.add_event_detect(self.pin_ab[i], GPIO.BOTH, callback=callback) for i in range(len(self.pin_pwm)): GPIO.setup(self.pin_pwm[i], GPIO.OUT) self.pwm[i]=GPIO.PWM(self.pin_pwm[i], 100) self.pwm[i].start(70) def cnt_chk(self,pin): no=self.chk_pin(pin) current_a=GPIO.input(self.pin_ab[2*no]) current_b=GPIO.input(self.pin_ab[2*no+1]) encoded=(current_a<<1)|current_b sum=(self.prev_data[no]<<2)|encoded if (sum==0b0010 or sum==0b1011 or sum==0b1101 or sum==0b0100): self.cnt[no]+=1 elif(sum==0b0001 or sum==0b0111 or sum==0b1110 or sum==0b1000): self.cnt[no]-=1 self.prev_data[no]=encoded def calc_data(self): self.calc_phi() self.calc_theta() self.calc_pos() def get_cnt(self): return self.cnt def calc_phi(self): global odo now=time.time() self.dt=now-self.prev_time print("dt:",self.dt) for i in range(2): if self.cnt[i] != self.prev_cnt[i]: self.phi[i]=self.cnt[i]*self.delta self.v[i]=self.r*(self.phi[i]-self.prev_phi[i])/self.dt self.prev_cnt[i]=self.cnt[i] self.prev_phi[i]=self.phi[i] else: self.v[i]=0 self.set_prev_time(now) def set_prev_time(self,now): self.prev_time=now def get_phi(self): return self.phi def get_vel(self): return self.v def calc_theta(self): omega=(self.v[1]-self.v[0])/(2*self.d) self.theta+=omega*self.dt def get_theta(self): return self.theta def get_dt(self): return self.dt def calc_pos(self): v=(self.v[0]+self.v[1])/2 self.pos[0]+=v*math.cos(self.theta)*self.dt self.pos[1]+=v*math.sin(self.theta)*self.dt def get_pos(self): return self.pos def chk_pin(self,pin): if(self.pin_ab[0]==pin or self.pin_ab[1]==pin): return 0 else: return 1 def get_pin(self): return self.pin_m def cleanup(self): for i in range(len(self.pin_ab)): GPIO.remove_event_detect(self.pin_ab[i]) GPIO.cleanup() def motor_cntl(self): global joystick if (move_flag): gain=[1,1] if(abs(joystick)>90): self.forward() if(joystick>0): gain[0]=1-(180-abs(joystick))/90 else: gain[1]=1-(180-abs(joystick))/90 else: self.backward() if(joystick>0): gain[0]=1-abs(joystick)/90 else: gain[1]=1-abs(joystick)/90 self.pwm[0].ChangeDutyCycle(60*gain[0]) self.pwm[1].ChangeDutyCycle(60*gain[1]) else: self.stop() def forward(self): GPIO.output(self.pin_m[0],GPIO.LOW) GPIO.output(self.pin_m[1],GPIO.HIGH) GPIO.output(self.pin_m[2],GPIO.LOW) GPIO.output(self.pin_m[3],GPIO.HIGH) def backward(self): GPIO.output(self.pin_m[0],GPIO.HIGH) GPIO.output(self.pin_m[1],GPIO.LOW) GPIO.output(self.pin_m[2],GPIO.HIGH) GPIO.output(self.pin_m[3],GPIO.LOW) def turn_right(self): GPIO.output(self.pin_m[0],GPIO.HIGH) GPIO.output(self.pin_m[1],GPIO.LOW) GPIO.output(self.pin_m[2],GPIO.LOW) GPIO.output(self.pin_m[3],GPIO.HIGH) def turn_left(self): GPIO.output(self.pin_m[0],GPIO.LOW) GPIO.output(self.pin_m[1],GPIO.HIGH) GPIO.output(self.pin_m[2],GPIO.HIGH) GPIO.output(self.pin_m[3],GPIO.LOW) def stop(self): GPIO.output(self.pin_m[0],GPIO.LOW) GPIO.output(self.pin_m[1],GPIO.LOW) GPIO.output(self.pin_m[2],GPIO.LOW) GPIO.output(self.pin_m[3],GPIO.LOW) |
簡単に解説すると、 モータが回るとcnt_chk関数が呼ばれてパルスカウントします。そしてプログラムのメインループで、calc_dataを呼び出して、各数値を計算します。motor_cntl関数はモータの制御をしていて、今回はジョイスティックからの値を元にして動くようにしています。
動作
動作については動画の後半にあります。オドメトリによって推定した位置をリアルタイムでグラフに描画しています。なお、グラフ表示には定番のMatplotlibを使っています。
動画では動作時間が短いのでそれなりに推定できるように見えますが、やはり動作し続けていると誤差は大きくなっていきます。ロボットの向きに関してはジャイロセンサなどを使えば精度が上がると思います。もう少し精度が上がればSLAMにも調整してみたいです。
-
前の記事
![[M5StickC]Wifi経由でジョイスティックの値をRaspberry Piに送信](https://oki-lab.net/wp-content/uploads/2020/07/20.07.25_joystick-150x150.jpg)
[M5StickC]Wifi経由でジョイスティックの値をRaspberry Piに送信 2020.07.25
-
次の記事

Raspberry Pi (Ubuntu)でVNC 2020.08.12
